FTC Setup

Limelight 3A for FTC is designed to make vision processing easier than ever. Here's a quick overview of the process:
- Connect your Limelight to your Laptop with a USB cable
- Configure up to 10 vision pipelines with the Limelight's built-in web interface.
- Each Pipeline has a "type". For example, you can configure pipeline 0 to be an "AprilTag" pipeline
- You can write your own pipelines by setting the pipeline type to "Python Snapscript"
- The built-in pipeline types can track colored gamepieces, run neural networks, and localize your robot in 3D based on an uploaded field map. Each 3A ships with a built-in Into The Deep field map
- Once you've tested your pipelines on your laptop, you can plug your Limelight into your Control Hub's USB 3.0 Port.
- Check out the FTC programming samples to get results data from your LL into your robot code.
Here's a more detailed getting-started guide:
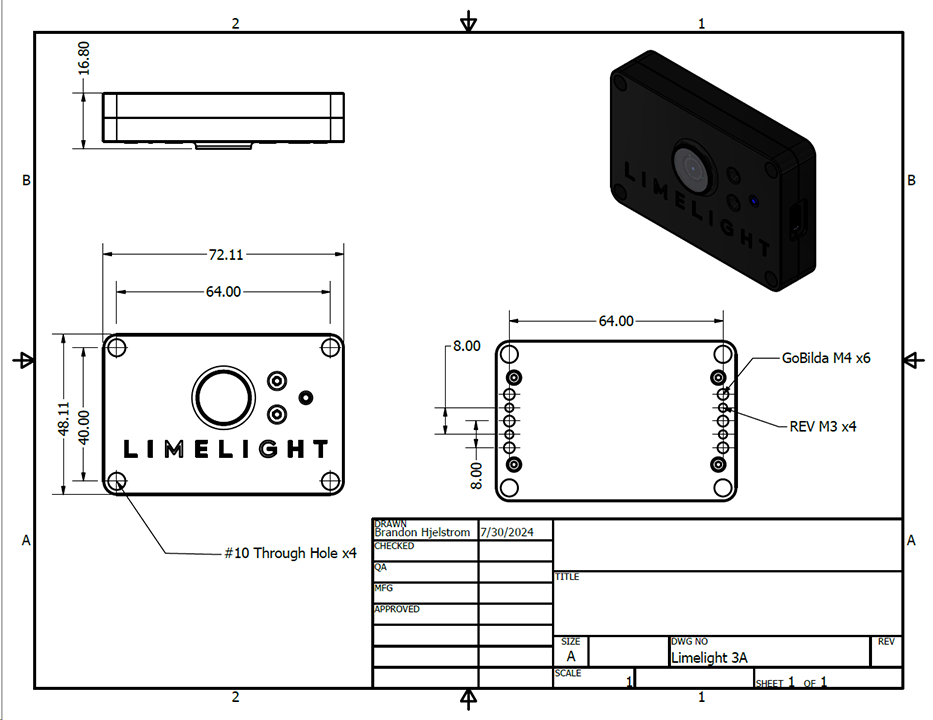
Mounting & CAD
- Use at least 2 M3 or M4 screws to mount your LL3A to Rev or GoBilda Channel using the threaded mount holes.
- You can also use VHB tape or zip ties to constrain your Limelight
- CAD: Go to the Downloads Page.
Updating LimelightOS
Limelights ship with a preinstalled image. You can probably skip this step for now.
Update Instructions (Windows)
Save your pipelines before updating LimelightOS. They will be deleted during the update.
- Download the latest USB drivers, Limelight OS image, and Balena Flash tool from from the Downloads Page.
- Reboot your machine after installing drivers.
- Hold the blue config button on your Limelight
- While holding, run a USB->USB-C cable from your laptop to your limelight. Your limelight will power on automatically.
- After you've plugged your LL into your laptop, you can release the blue config button
- Your Limelight is now in flash mode, and its LEDs will not blink.
- Run “Balena Etcher” as an administrator.
- It may take up to 20 seconds for your machine to recognize the camera.
- Select the latest .zip image in your downloads folder
- Select a “Compute Module” device in the “Drives” menu
- Click “Flash”
- Once flashing is complete, remove the usb cable from your limelight.
Update Instructions (Advanced) (macOS & Linux)
Save your pipelines before updating LimelightOS. They will be deleted during the update.
We are working to dramatically simplify the update process on macOS and Linux
- Download the Limelight OS image and Balena Flash tool from from the Downloads Page.
- Build the USB Boot driver yourself:
brew install libusb
brew install pkg-config
git clone --recurse-submodules --shallow-submodules --depth=1 https://github.com/raspberrypi/usbboot
cd usbboot
make
cd mass-storage-gadget64
sudo ../rpiboot -d .
# As long as rpiboot is running, your camera will properly enumerate on macOS and Linux
# You need to run rpiboot every time you want to flash.
- Hold the blue config button on your Limelight
- While holding, run a USB->USB-C cable from your laptop to your limelight. Your limelight will power on automatically.
- After you've plugged your LL into your laptop, you can release the blue config button
- Your Limelight is now in flash mode, and its LEDs will not blink.* Run “Balena Etcher”.
- It may take up to 20 seconds for your machine to recognize the camera.
- Select the latest .zip image in your downloads folder
- Select a “Compute Module” device in the “Drives” menu
- Click “Flash”
- Once flashing is complete, remove the usb cable from your limelight.
Robot Wiring
When you're ready to use your LL on your robot, run a USBC to USBA cable from your LL3A to your Control Hub's USB 3.0 Port. Limelight 3A does not support Google Coral. You can still use neural detection and classification pipelines by setting the neural network runtime engine to "cpu"
Control Hub Setup
- Update your Control Hub OS, DriverStation App, RobotController App, and SDK to their latest verions.
- Connect your Limelight to your ControlHub and wait for the Limelight's green status light to begin blinking
- Connect your ControlHub to your robot's WiFi network
- In the FTC DriverStation App, click "Configure Robot"
- If you don't have an active configuration, you may need to make a new one.
- Click the "scan" button
- You should see an "Ethernet Device" appear.
- You can edit the name of this device to "limelight" for clarity.
- Now you can initilize a Limelight3A object in your code using the hardware map.
Frequently Asked Questions
Why does my Limelight feel so hot?
For Limelight to run as cool as possible, it necessarily needs to feel as hot as possible/as is safe to the touch. Its enclosure is a highly conductive heatsink that helps keep the CPU at a reasonably cool temperature.
Imagine the difference in feeling between a -20F metal pole and a -20F blade of grass. They will feel vastly different to the touch because the pole will conduct heat so much more efficiently than the grass.
Why does the image look so grainy?
To minimize latency, we skip several filters that are normallly present on commerical cameras. Also, the image stream you see is highly compressed to minimize bitrate. In 2024.10.1, we changed the default color balance values to make images look more natural and vibrant to the human eye.
What does Limelight offer over OpenCV on the ControlHub?
An out-of-the-box, zero-code, multi-tag localization algorithm with robot IMU sensor fusion, neural networks, and more.