Inicio Rápido de Limelight 1

Especificaciones de Hardware
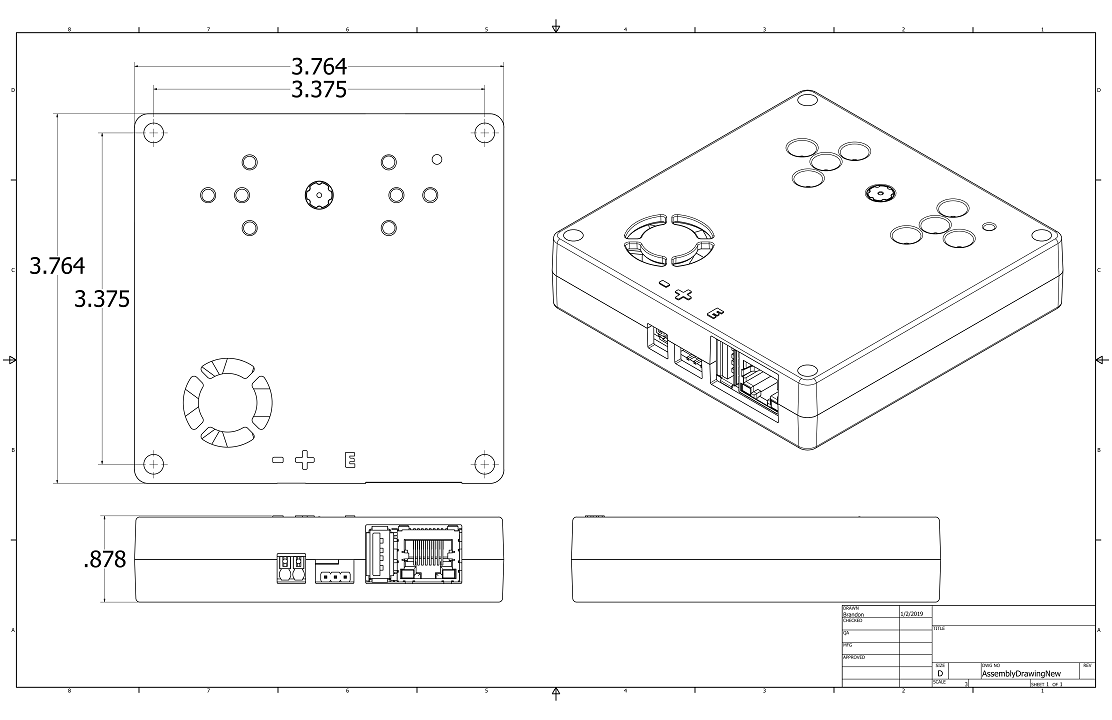
- Dimensiones: 3.764in x 3.764in (95.67mm x 95.67mm)
- Grosor: 0.878in (22.30mm)
- Montaje con orificios pasantes #10 / M4
- Entrada de Alimentación: 4.1V-16V
- Consumo máximo de energía de 10W
- Iluminación LED: 400 lúmenes, iluminación verde
- Sensor: OV5647 Color Rolling Shutter (320x240 @ 90FPS)
- Lente M12 Reemplazable
- Carcasa de Policarbonato Negro Resistente a Impactos
- Puerto Ethernet RJ45 10/100
- Serial RS-232 (3.3V)
- Puerto USB-A Host (USB 2.0)
- Luces de Estado: Verde (detección de objetivo), Amarillo (estado de red)
- Soporte para Acelerador de Red Neuronal Google Coral USB
Capacidades de Software (Limelight OS)
- Visión de alto rendimiento plug-and-play. No se requiere experiencia.
- Interfaz de usuario basada en navegador auto-alojada para configuración de pipelines de visión
- Soporte para REST/HTTP, Websocket, NetworkTables, ModbusTCP y ROS
- Exposición fija configurable, ganancia del sensor, resolución y tasa de cuadros.
- Configura 10 Pipelines de Visión Intercambiables en Caliente:
- Pipelines Python Personalizados con OpenCV 4.10, numpy, etc.
- Seguimiento de AprilTag 2D, 3D y Localización de Robot
- Localización 3D Completa (GPS de Robot) con MegaTag1
- Localización 3D Completa de Mayor Precisión (GPS de Robot) con Fusión de IMU Externo con MegaTag2
- Visualizador 3D completo en la interfaz web
- Pipelines de detección de manchas de color a 90FPS
- Pipelines de Detección de Objetos con Redes Neuronales
- Pipelines de Clasificación de Imágenes con Redes Neuronales
- Pipelines de Seguimiento de Códigos de Barras
- Pipeline de visor para streaming de baja latencia
- Streaming MJPEG de baja latencia integrado. Orientación de stream configurable
1. Montaje de Limelight 1
Montaje con Orificios Pasantes
- Usa tornillos #10-32 o #10-24 de 1 1/4" con tuercas nylock
- Alternativamente, usa pernos M4 de 38mm con tuercas nylock
- Usa arandelas de plástico para preservar el acabado de la carcasa
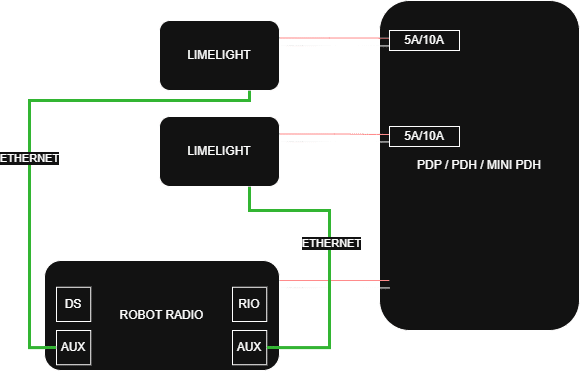
2. Cableado de Limelight 1
Alimentación
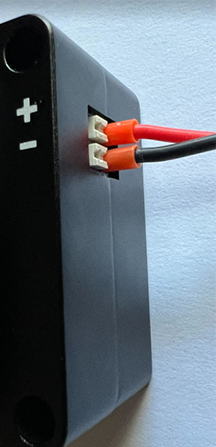
- Conecta dos cables de 18-20AWG desde tu Limelight a una ranura en tu PDP/PDH
- Añade un fusible de 5A en la misma ranura
- (No Requerido) Usa terminales Weidmuller para resultados óptimos (En la imagen, cable de 20AWG con terminales Weidmuller naranja de 20AWG)
- Terminales:
- Herramientas de crimpado de terminales de bajo costo:
Ethernet
- Conecta un cable ethernet desde tu Limelight a la radio de tu robot
- Usa cables Cat6 trenzados con cables trenzados (idealmente 20AWG)
- Añade un alivio de tensión a tu cable ethernet
3. Acceso a la Interfaz Web
Después de conectar tu Limelight 1 a tu red:
- Enciende tu robot y conecta tu laptop a la red de tu robot
- Usa uno de estos métodos para acceder a la interfaz web:
- Método 1: Abre la aplicación Limelight Hardware Manager, busca Limelights y haz doble clic en tu Limelight cuando aparezca
- Método 2: Abre un navegador web y navega a
http://limelight.local:5801 - Método 3: Abre un navegador web y navega a la dirección IP estática de tu Limelight con el puerto 5801 (si está configurada)
Una vez conectado, tendrás acceso a:
- Pestaña de Configuración - Configura el número de equipo, nombre de host y otras configuraciones del sistema
- Pestañas de Pipeline de Visión - Configura y ajusta tus pipelines de procesamiento de visión
- Pestaña de Cámara y Retícula - Ajusta la configuración de la cámara y los parámetros de la retícula
Toda la configuración se realiza a través de esta interfaz web. Los cambios se guardan automáticamente en tu Limelight.
4. Actualización de LimelightOS
Algunas versiones de Limelight 1 son sensibles a la electricidad estática alrededor del puerto micro-USB. Para evitar dañar el puerto, conéctate a tierra tocando algo metálico antes de conectar al puerto micro-USB. Esto asegurará que tu carga estática personal se haya descargado.
¡Haz una copia de seguridad de tus pipelines y scripts antes de actualizar - serán borrados durante este proceso!
- Apaga tu Limelight
- Descarga los últimos controladores USB, imagen de Limelight OS y herramienta Balena Flash
- Conecta un cable USB->MicroUSB desde tu laptop a tu Limelight
- Enciende tu Limelight
- Ejecuta "Balena Etcher" como administrador
- Puede tomar hasta 20 segundos para que tu máquina reconozca la cámara
- Selecciona la última imagen .zip en tu carpeta de descargas
- Selecciona un dispositivo "Compute Module" en el menú "Drives"
- Haz clic en "Flash"
- Una vez completado el flasheo, desconecta la alimentación de tu Limelight
Solo conecta el cable micro-USB mientras haces la imagen. Limelight entra en un modo especial de flasheo mientras el cable microUSB está conectado. No podrás acceder a la interfaz web mientras Limelight está en modo de flasheo.
5. Configuración de Red
Configuración del Número de Equipo (Requerido para FRC / Networktables)
- Enciende tu robot y conecta tu laptop a la red de tu robot
- Abre el Limelight Hardware Manager, busca Limelights y haz doble clic en la entrada que aparezca
- Alternativamente, navega a http://limelight.local:5801
- Ve a la pestaña "Settings"
- Ingresa tu número de equipo y presiona "Update Team Number"
Configuración de un Nombre de Host Único (Solo Requerido para sistemas FRC / Networktables con múltiples Limelights)
- Si estás usando múltiples Limelights, cada Limelight debe tener un nombre de host único
- En la pestaña de configuración, configura un nombre de host y haz clic en el botón "set hostname"
Configuración de IP Estática (Recomendado, no requerido)
- Cambia "IP Assignment" a "Static"
- Configura la dirección IP a "10.TE.AM.11"
- El equipo 916 usa 10.9.16.xx
- El equipo 9106 usa 10.91.6.xx
- El equipo 9016 usa 10.90.16.xx
- Configura la Máscara de Red a "255.255.255.0"
- Configura el Gateway a "10.TE.AM.1"
- Haz clic en "Update"
- Reinicia tu robot
- Accede a tu panel de configuración en 10.TE.AM.11:5801 y al stream de la cámara en 10.TE.AM.11:5800
- Si estás usando múltiples Limelights, asigna a cada Limelight una dirección IP estática única
P. ¿Por qué recomendamos el uso de una dirección IP estática?
R. Reduce varios segundos del tiempo de arranque de Limelight. Segundo, los equipos históricamente han tenido problemas con la asignación DHCP y los respondedores mDNS en campos FRC reales y con el firmware de radio de eventos.
Recomendamos configurar direcciones IP estáticas en tu robo-rio y estación de conductor también. Las configuraciones de red a usar en todos estos dispositivos se pueden encontrar cerca de la mitad inferior de esta página web
6. Control de los LEDs
Limelight 1 incluye LEDs de iluminación verde integrados. Estos LEDs se pueden controlar de varias maneras:
A través de la Interfaz Web
- Navega a la pestaña Camera & Crosshair en la interfaz web
- Usa el menú desplegable LED Mode para seleccionar:
- On - Siempre encendido
- Off - Siempre apagado
- Blink - Parpadeo de los LEDs
- Pipeline - Los LEDs se encienden cuando se detecta un objetivo
A través de NetworkTables o API
- Configura el valor "ledMode":
- 0: Predeterminado del pipeline
- 1: Forzar apagado
- 2: Forzar parpadeo
- 3: Forzar encendido
7. Solución de Problemas
Indicadores de Luz de Estado
- Luz Verde: Parpadea lentamente (sin objetivos), parpadea rápidamente (objetivos detectados)
- Luz Amarilla: Parpadea (sin IP estática), sólida (IP estática asignada)
Patrones de Diagnóstico LED
- Parpadeo alternado izquierda/derecha o arriba/abajo: El cable interno de la cámara se ha desconectado o el sensor de imagen está dañado
- Parpadeo Rápido (todos los LEDs): El botón de reinicio de red se ha mantenido presionado durante al menos 10 segundos
- Secuencia de Inicio Repetida: El software está fallando, posiblemente debido a daño de hardware
Si limelight.local:5801 no funciona
- Verifica si tienes Bonjour instalado (Windows: agregar/quitar programas)
- Desinstala "bonjour print services" si tienes dos elementos de Bonjour
- Instala Bonjour desde la página de Descargas si falta
Restablecer dirección IP
- Mantén presionado el botón de configuración durante 10 segundos después de que tu Limelight haya arrancado
- La configuración de red se restablecerá a direccionamiento dinámico en el próximo arranque