Inicio Rápido de Programación FRC
Limelight soporta los protocolos REST/HTTP, Websocket, Modbus y NetworkTables para datos de objetivo, datos de estado y configuración en vivo. Están disponibles formatos de salida JSON y raw. Consulta la sección de APIs en la documentación para más información.
Para equipos FRC, el protocolo recomendado es NetworkTables. Limelight publica todos los datos de objetivo, incluyendo un volcado JSON completo, a NetworkTables a 100hz. Los equipos también pueden establecer controles como el ledMode, ventana de recorte y más a través de NetworkTables. Los equipos FRC pueden usar las bibliotecas Limelight Lib Java y C++ para comenzar con Limelight en segundos. Limelight Lib es la forma más fácil de empezar
LimelightLib:
- Java
- C++
- Python
double tx = LimelightHelpers.getTX("");
#include "LimelightHelpers.h"
double tx = LimelightHelpers::getTX("");
double ty = LimelightHelpers::getTY("");
wip
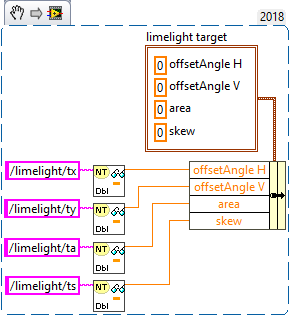
Si quieres saltarte LimelightLib y comenzar directamente a programar con NetworkTables:
- Java
- C++
- LabView
- Python
import edu.wpi.first.wpilibj.smartdashboard.SmartDashboard;
import edu.wpi.first.networktables.NetworkTable;
import edu.wpi.first.networktables.NetworkTableEntry;
import edu.wpi.first.networktables.NetworkTableInstance;
NetworkTable table = NetworkTableInstance.getDefault().getTable("limelight");
NetworkTableEntry tx = table.getEntry("tx");
NetworkTableEntry ty = table.getEntry("ty");
NetworkTableEntry ta = table.getEntry("ta");

//leer valores periódicamente
double x = tx.getDouble(0.0);
double y = ty.getDouble(0.0);
double area = ta.getDouble(0.0);

//publicar en smart dashboard periódicamente
SmartDashboard.putNumber("LimelightX", x);
SmartDashboard.putNumber("LimelightY", y);
SmartDashboard.putNumber("LimelightArea", area);
#include "frc/smartdashboard/Smartdashboard.h"
#include "networktables/NetworkTable.h"
#include "networktables/NetworkTableInstance.h"
#include "networktables/NetworkTableEntry.h"
#include "networktables/NetworkTableValue.h"
#include "wpi/span.h"
std::shared_ptr<nt::NetworkTable> table = nt::NetworkTableInstance::GetDefault().GetTable("limelight");
double targetOffsetAngle_Horizontal = table->GetNumber("tx",0.0);
double targetOffsetAngle_Vertical = table->GetNumber("ty",0.0);
double targetArea = table->GetNumber("ta",0.0);
double targetSkew = table->GetNumber("ts",0.0);

import cv2
import numpy as np

# runPipeline() es llamado en cada frame por el backend de Limelight.
def runPipeline(image, llrobot):
    # convertir la imagen de entrada al espacio de color HSV
    img_hsv = cv2.cvtColor(image, cv2.COLOR_BGR2HSV)
    # convertir el HSV a una imagen binaria eliminando cualquier píxel
    # que no caiga dentro de los siguientes valores Min/Max de HSV
    img_threshold = cv2.inRange(img_hsv, (60, 70, 70), (85, 255, 255))

    # encontrar contornos en la nueva imagen binaria
    contours, _ = cv2.findContours(img_threshold,
    cv2.RETR_EXTERNAL, cv2.CHAIN_APPROX_SIMPLE)

    largestContour = np.array([[]])

    # inicializar un array vacío de valores para enviar de vuelta al robot
    llpython = [0,0,0,0,0,0,0,0]

    # si se han detectado contornos, dibujarlos
    if len(contours) > 0:
        cv2.drawContours(image, contours, -1, 255, 2)
        # registrar el contorno más grande
        largestContour = max(contours, key=cv2.contourArea)

        # obtener el rectángulo delimitador no rotado que rodea el contorno
        x,y,w,h = cv2.boundingRect(largestContour)

        # dibujar el rectángulo delimitador no rotado
        cv2.rectangle(image,(x,y),(x+w,y+h),(0,255,255),2)

        # registrar algunos datos personalizados para enviar de vuelta al robot
        llpython = [1,x,y,w,h,9,8,7]

    #devolver el contorno más grande para la mira de LL, la imagen modificada y datos personalizados del robot
    return largestContour, image, llpython