Démarrage rapide Limelight 3A
Spécifications matérielles
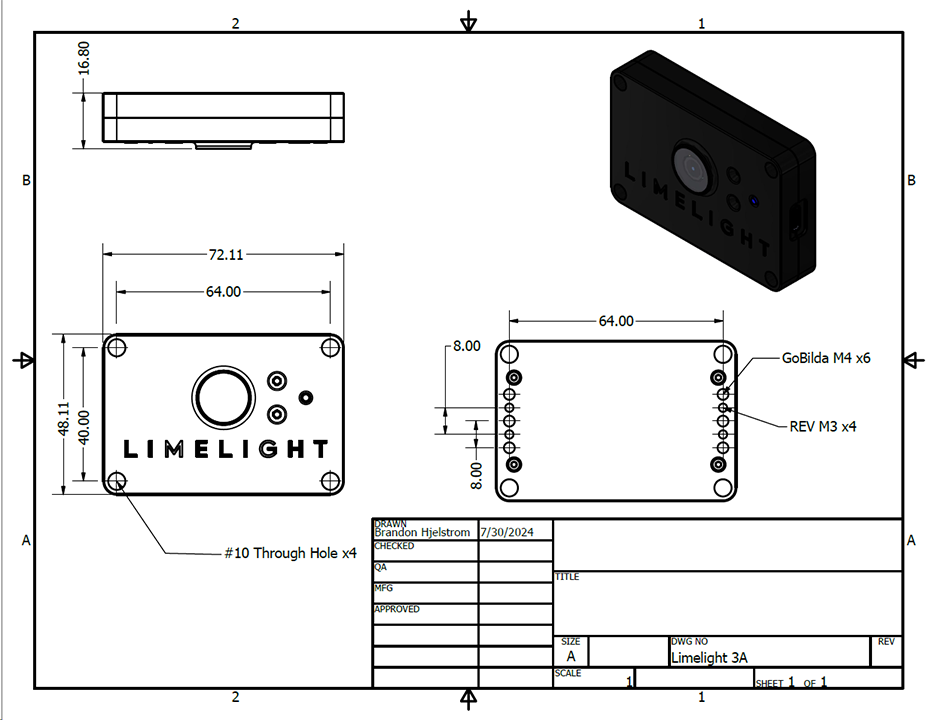
- Dimensions : 2,839po x 1,894po (72,11mm x 48,11mm)
- Épaisseur : 0,661po (16,80mm)
- Masse : 0,20 lb
- Montage : 4x trous traversants #10, 4x M3, 6x trous de montage filetés M4
- Alimentation : 4,1V-5,75V via USB
- Consommation maximale : 4W
- Capteur : OV5647 Couleur à obturateur déroulant (640x480 @ 90FPS)
- Pas d'éclairage LED intégré
- Champ de vision : H:54,5° V:42°
- Connectivité USB-C uniquement (pas de port RJ45)
- Voyant d'état : Vert (détection de cible)
- Optimisé pour la compatibilité FTC
Capacités logicielles (Limelight OS)
- Vision haute performance prête à l'emploi. Aucune expérience requise.
- Interface utilisateur web auto-hébergée pour la configuration des pipelines de vision
- Support pour FTC (intégration Java directe) et FRC (interface NetworkTables)
- Exposition, gain du capteur, résolution et fréquence d'images configurables
- Configurez 10 pipelines de vision interchangeables à chaud :
- Pipelines Python personnalisés avec OpenCV 4.10, numpy, etc.
- Suivi AprilTag 2D, 3D et localisation du robot
- Localisation 3D complète (GPS Robot) avec MegaTag1
- Localisation 3D complète de haute précision (GPS Robot) avec fusion IMU externe avec MegaTag2
- 20fps @ 1280x960 (sous-échantillonnage 2x), 50fps @ 640x480 (sous-échantillonnage 2x)
- Visualiseur 3D complet dans l'interface web
- Pipelines de détection de blobs couleur à 90FPS
- Pipelines de détection d'objets par réseau neuronal (inférence CPU uniquement)
- Pipelines de classification d'images par réseau neuronal (inférence CPU uniquement)
- Pipelines de suivi de codes-barres
- Interface de calibration intrinsèque Charuco intégrée
- Streaming MJPEG à faible latence intégré
1. Montage du Limelight 3A
Montage fileté (Recommandé)
- Utilisez au moins 2 vis M3 ou M4 pour monter votre LL3A sur un profilé Rev ou GoBilda en utilisant les trous de montage filetés
- Vous pouvez également utiliser du ruban VHB ou des colliers de serrage pour fixer votre Limelight
Montage par trous traversants
- Utilisez des boulons #10-32 ou #10-24 de 1 1/4" avec des écrous autobloquants
- Alternativement, utilisez des boulons M4 de 28mm avec des écrous autobloquants
2. Câblage du Limelight 3A
Lorsque vous êtes prêt à utiliser votre Limelight sur votre robot :
Pour FTC
- Connectez un câble USB-C vers USB-A de votre Limelight 3A au port USB 3.0 de votre Control Hub
- Connectez-vous à votre Control Hub en branchant sur un port USB 3.0 (port bleu)
Pour FRC
- Connectez votre Limelight 3A au port USB de votre roboRIO
- Utilisez un câble USB-C vers USB-A
Le Limelight 3A ne supporte pas Google Coral. Vous pouvez toujours utiliser les pipelines de détection et classification neuronale en réglant le moteur d'exécution du réseau neuronal sur "CPU".
3. Accès à l'interface web
Après avoir connecté votre Limelight 3A à votre ordinateur via USB :
- Attendez que le voyant d'état vert s'active (environ 15-20 secondes)
- Utilisez l'une de ces méthodes pour accéder à l'interface web :
- Méthode 1 : Ouvrez l'application Limelight Hardware Manager, recherchez les Limelights, et double-cliquez sur votre Limelight 3A lorsqu'il apparaît
- Méthode 2 : Ouvrez un navigateur web et naviguez vers
http://limelight.local:5801
Une fois connecté, vous aurez accès à :
- Onglet Paramètres - Configurez le numéro d'équipe, le nom d'hôte et autres paramètres système
- Onglets Pipeline de vision - Configurez et ajustez vos pipelines de traitement de vision
- Onglet Caméra et réticule - Ajustez les paramètres de la caméra et du réticule
- Onglet Visualisation 3D - Visualisez la détection AprilTag et la localisation en temps réel
Toute la configuration se fait via cette interface web. Les modifications sont automatiquement sauvegardées sur votre Limelight.
4. Mise à jour de LimelightOS
Les Limelights sont livrés avec une image préinstallée. Vous pouvez probablement sauter cette étape pour l'instant.
Instructions de mise à jour (Windows)
Sauvegardez vos pipelines avant de mettre à jour LimelightOS. Ils seront supprimés pendant la mise à jour.
- Téléchargez les derniers pilotes USB, l'image Limelight OS et l'outil Balena Flash depuis la Page de téléchargements
- Redémarrez votre machine après l'installation des pilotes
- Maintenez le bouton de configuration bleu sur votre Limelight
- Tout en maintenant, connectez un câble USB->USB-C de votre ordinateur portable à votre Limelight (votre Limelight s'allumera automatiquement)
- Après avoir branché votre LL à votre ordinateur portable, vous pouvez relâcher le bouton de configuration bleu
- Votre Limelight est maintenant en mode flash, et ses LEDs ne clignoteront pas
- Exécutez "Balena Etcher" en tant qu'administrateur
- Cela peut prendre jusqu'à 20 secondes pour que votre machine reconnaisse la caméra
- Sélectionnez la dernière image .zip dans votre dossier de téléchargements
- Sélectionnez un périphérique "Compute Module" dans le menu "Drives"
- Cliquez sur "Flash"
- Une fois le flashage terminé, retirez le câble USB de votre Limelight
Instructions de mise à jour (Avancé) (macOS & Linux)
Sauvegardez vos pipelines avant de mettre à jour LimelightOS. Ils seront supprimés pendant la mise à jour.
Nous travaillons à simplifier considérablement le processus de mise à jour sur macOS et Linux
- Téléchargez l'image Limelight OS et l'outil Balena Flash depuis la Page de téléchargements
- Compilez vous-même le pilote USB Boot :
brew install libusb
brew install pkg-config
git clone --recurse-submodules --shallow-submodules --depth=1 https://github.com/raspberrypi/usbboot
cd usbboot
make
cd mass-storage-gadget64
sudo ../rpiboot -d .
# Tant que rpiboot est en cours d'exécution, votre caméra sera correctement énumérée sur macOS et Linux
# Vous devez exécuter rpiboot chaque fois que vous voulez flasher.
- Maintenez le bouton de configuration bleu sur votre Limelight
- Tout en maintenant, connectez un câble USB->USB-C de votre ordinateur portable à votre Limelight (votre Limelight s'allumera automatiquement)
- Après avoir branché votre LL à votre ordinateur portable, vous pouvez relâcher le bouton de configuration bleu
- Votre Limelight est maintenant en mode flash, et ses LEDs ne clignoteront pas
- Exécutez "Balena Etcher"
- Cela peut prendre jusqu'à 20 secondes pour que votre machine reconnaisse la caméra
- Sélectionnez la dernière image .zip dans votre dossier de téléchargements
- Sélectionnez un périphérique "Compute Module" dans le menu "Drives"
- Cliquez sur "Flash"
- Une fois le flashage terminé, retirez le câble USB de votre Limelight
5. Processus de configuration
Pour FTC
- Connectez votre Limelight à votre ordinateur portable avec un câble USB
- Accédez à l'interface web comme décrit dans la section 3
- Allez dans l'onglet Paramètres et définissez votre numéro d'équipe, puis cliquez sur "Restart Vision Client"
- Configurez vos pipelines selon vos besoins (AprilTag, réseaux neuronaux, Python personnalisé, etc.)
- Lorsque vous êtes prêt pour la compétition, branchez votre Limelight 3A sur le port USB 3.0 de votre Control Hub
- Dans l'application FTC DriverStation, cliquez sur "Configure Robot"
- Si vous n'avez pas de configuration active, vous devrez peut-être en créer une nouvelle
- Cliquez sur le bouton "scan"
- Vous devriez voir apparaître un "Ethernet Device"
- Vous pouvez modifier le nom de ce périphérique en "limelight" pour plus de clarté
- Vous pouvez maintenant initialiser un objet Limelight3A dans votre code en utilisant le hardware map
Pour FRC
- Connectez votre Limelight 3A à votre ordinateur portable, attendez l'activité du voyant d'état
- Accédez à l'interface web comme décrit dans la section 3
- Dans l'onglet Paramètres, définissez votre numéro d'équipe et cliquez sur "Restart Vision Client"
- Configurez vos pipelines selon vos besoins
- Lorsque vous êtes prêt, branchez votre Limelight 3A sur le port USB de votre roboRIO
- Ouvrez votre tableau de bord préféré pour vous assurer que votre 3A envoie des données aux NetworkTables de votre roboRIO
- Ajoutez la redirection de port pour permettre l'édition de pipeline en direct lorsque vous êtes connecté au réseau de votre robot :
- Java
- CPP
// (robotIP):5801 pointera maintenant vers le flux de l'interface web d'un Limelight3A (id 0) :
// (robotIP):5800 pointera maintenant vers le flux vidéo d'un Limelight3A (id 0) :
PortForwarder.getInstance().add(5801, "172.29.0.1", 5801);
PortForwarder.getInstance().add(5802, "172.29.0.1", 5802);
PortForwarder.getInstance().add(5803, "172.29.0.1", 5803);
PortForwarder.getInstance().add(5804, "172.29.0.1", 5804);
PortForwarder.getInstance().add(5805, "172.29.0.1", 5805);
PortForwarder.getInstance().add(5806, "172.29.0.1", 5806);
PortForwarder.getInstance().add(5807, "172.29.0.1", 5807);
PortForwarder.getInstance().add(5808, "172.29.0.1", 5808);
PortForwarder.getInstance().add(5809, "172.29.0.1", 5809);

// (robotIP):5811 pointera maintenant vers le flux de l'interface web d'un Limelight3A (id 1) :
// (robotIP):5810 pointera maintenant vers le flux vidéo d'un Limelight3A (id 1) :
PortForwarder.getInstance().add(5811, "172.29.1.1", 5801);
PortForwarder.getInstance().add(5812, "172.29.1.1", 5802);
PortForwarder.getInstance().add(5813, "172.29.1.1", 5803);
PortForwarder.getInstance().add(5814, "172.29.1.1", 5804);
PortForwarder.getInstance().add(5815, "172.29.1.1", 5805);
PortForwarder.getInstance().add(5816, "172.29.1.1", 5806);
PortForwarder.getInstance().add(5817, "172.29.1.1", 5807);
PortForwarder.getInstance().add(5818, "172.29.1.1", 5808);
PortForwarder.getInstance().add(5819, "172.29.1.1", 5809);
// (robotIP):5801 pointera maintenant vers le flux de l'interface web d'un Limelight3A (id 0) :
// (robotIP):5800 pointera maintenant vers le flux vidéo d'un Limelight3A (id 0) :
wpi::PortForwarder::GetInstance().Add(5801,"172.29.0.1",5801);
wpi::PortForwarder::GetInstance().Add(5802,"172.29.0.1",5802);
wpi::PortForwarder::GetInstance().Add(5803,"172.29.0.1",5803);
wpi::PortForwarder::GetInstance().Add(5804,"172.29.0.1",5804);
wpi::PortForwarder::GetInstance().Add(5805,"172.29.0.1",5805);
wpi::PortForwarder::GetInstance().Add(5806,"172.29.0.1",5806);
wpi::PortForwarder::GetInstance().Add(5807,"172.29.0.1",5807);
wpi::PortForwarder::GetInstance().Add(5808,"172.29.0.1",5808);
wpi::PortForwarder::GetInstance().Add(5809,"172.29.0.1",5809);

// (robotIP):5811 pointera maintenant vers le flux de l'interface web d'un Limelight3A (id 1) :
// (robotIP):5810 pointera maintenant vers le flux vidéo d'un Limelight3A (id 1) :
wpi::PortForwarder::GetInstance().Add(5811,"172.29.1.1",5801);
wpi::PortForwarder::GetInstance().Add(5812,"172.29.1.1",5802);
wpi::PortForwarder::GetInstance().Add(5813,"172.29.1.1",5803);
wpi::PortForwarder::GetInstance().Add(5814,"172.29.1.1",5804);
wpi::PortForwarder::GetInstance().Add(5815,"172.29.1.1",5805);
wpi::PortForwarder::GetInstance().Add(5816,"172.29.1.1",5806);
wpi::PortForwarder::GetInstance().Add(5817,"172.29.1.1",5807);
wpi::PortForwarder::GetInstance().Add(5818,"172.29.1.1",5808);
wpi::PortForwarder::GetInstance().Add(5819,"172.29.1.1",5809);
6. Types de pipelines disponibles
Le Limelight 3A offre les mêmes fonctionnalités de traitement de vision que les autres modèles Limelight :
- Suivi AprilTag et localisation du robot
- Suivi de blobs couleur
- Détection d'objets par réseau neuronal (CPU uniquement)
- Classification par réseau neuronal
- Suivi de codes-barres
- Pipelines Python personnalisés
Chaque 3A est livré avec une carte de terrain Into The Deep intégrée pour FTC.
7. Programmation FTC
Exemple FTC de base : Exemple FTC
La plupart des applications nécessitent moins de 10 lignes de code :
public class Teleop extends LinearOpMode {

    private Limelight3A limelight;

    @Override
    public void runOpMode() throws InterruptedException
    {
        limelight = hardwareMap.get(Limelight3A.class, "limelight");

        telemetry.setMsTransmissionInterval(11);

        limelight.pipelineSwitch(0);

        /*
         * Commence à interroger les données.
         */
        limelight.start();

        while (opModeIsActive()) {
            LLResult result = limelight.getLatestResult();
            if (result != null) {
                if (result.isValid()) {
                    Pose3D botpose = result.getBotpose();
                    telemetry.addData("tx", result.getTx());
                    telemetry.addData("ty", result.getTy());
                    telemetry.addData("Botpose", botpose.toString());
                }
            }
        }
    }
}
Pour une précision maximale de localisation 3D, appelez updateRobotOrientation() et utilisez getBotPose_MT2() :
while (opModeIsActive()) {
    YawPitchRollAngles orientation = imu.getRobotYawPitchRollAngles();
    limelight.updateRobotOrientation(orientation.getYaw(AngleUnit.DEGREES));
    LLResult result = limelight.getLatestResult();
    if (result != null) {
        if (result.isValid()) {
            Pose3D botpose = result.getBotpose_MT2();
            // Utilisez les données botpose
        }
    }
}
Pour plus d'informations, consultez la page Programmation FTC
8. Dépannage
Indicateurs du voyant d'état
- Voyant vert : Clignote lentement (pas de cibles), clignote rapidement (cibles détectées)
FAQ
-
Pourquoi mon Limelight semble-t-il si chaud ? Pour que le Limelight fonctionne aussi frais que possible, il doit nécessairement sembler aussi chaud que possible/aussi chaud que ce qui est sûr au toucher. Son boîtier est un dissipateur thermique hautement conducteur qui aide à maintenir le CPU à une température raisonnablement fraîche.
-
Pourquoi l'image semble-t-elle si granuleuse ? Pour minimiser la latence, plusieurs filtres normalement présents sur les caméras commerciales sont ignorés. Le flux est également compressé pour minimiser le débit. Dans la version 2024.10.1, nous avons modifié les valeurs de balance des blancs par défaut pour rendre les images plus naturelles et vibrantes à l'œil humain.
-
Qu'est-ce que Limelight offre par rapport à OpenCV sur le Control Hub ? Un algorithme de localisation multi-tags prêt à l'emploi, sans code, avec fusion de capteur IMU du robot, réseaux neuronaux, et plus encore.