Wiring
Limelight takes a 12V input, but is built to function down to 4.5V. Its LEDs have a constant brightness down to 7V.
caution
Do not use the REV radio power module to power your Limelight. Its output voltage is too high.
Credit - Christian Femia
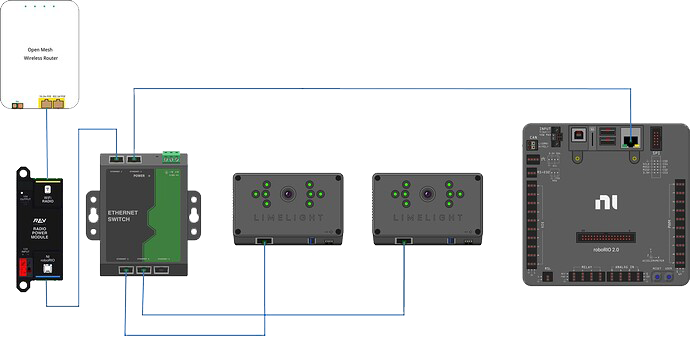
- Standard Wiring
- POE Wiring
- 2024 Update - We recommend the use of a separate VRM to power up to 2 limelights via the 12V outputs. The VRM will help protect your Limelights against load dumps and high voltages due to new regenerative braking features.
- Do not run wires to your VRM.
- Run two wires from your limelight to a slot on your PDP (NOT your VRM).
- Add any breaker (5A, 10A, 20A, etc.) to the same slot on your PDP.
- Run an ethernet cable from your Limelight to your robot radio.
- 2024 Update - We recommend the use of a separate VRM to power up to 2 limelights via the 12V outputs. The VRM will help protect your Limelights against load dumps and high voltages due to new regenerative braking features.
PoE allows you to add both power and network connectivity to your Limelight via an Ethernet cable.
caution
This is not standard IEEE 802.3 (44V-48V) PoE - this is why you must use a passive injector with 12V.
- (LIMELIGHT 1 ONLY) Ensure that your Limelight’s power jumper is set to the “E” position.
- Connect a passive Passive PoE Injector to your PDP (NOT your VRM).
- Add any breaker (5A, 10A, 20A, etc.) to the same slot on your PDP.
- Run an ethernet cable from your Limelight to your passive POE injector.
Wiring Best Practices
- 2024 Update - We recommend the use of a separate VRM to power up to 2 limelights via the 12V outputs. The VRM will help protect your Limelights against load dumps and high voltages due to new regenerative braking features.
- Add strain reliefs to all power and ethernet cables going to your LL.
- Hot-glue all connections.
- Add a network switch to your robot to enable ethernet tethering while at an event and to avoid the second radio port. We recommend the Branboxes SW-005 5 port Switch
- Use twisted Cat6 cables with stranded wires
- We do not recommend use of the second radio port. Route all devices through your network switch if possible.